
Topic
Vectorize photos manually
2020-04-14
With manual vectorizing, i.e. tracing, of photos, attractive results can be achieved. The amount of work and training required is often underestimated. Before tracing, important and unimportant things in the photo must be separated. This is the only way to filter the large amount of details with shadows and reflections for the illustration.
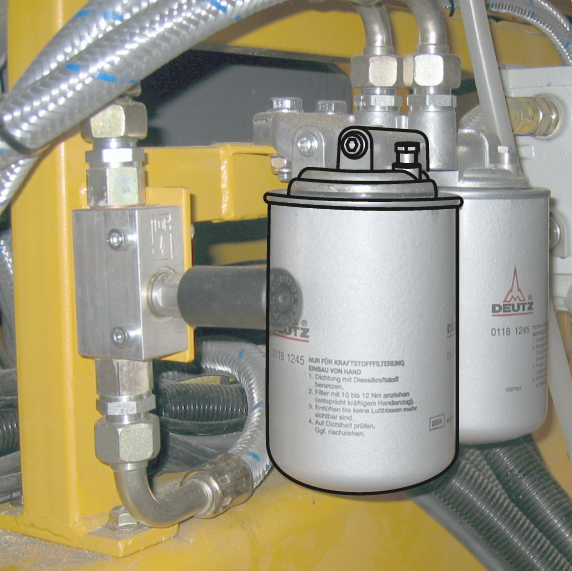
In Corel DESIGNER or CorelDRAW, you would do this to create an illustration based on a photo:
- Import the photo into Corel.
- Separate photo and illustration.
Assign separate layers or use Lock Object in the context menu of the photo. - Trace the photo with new objects.
Always create closed curves to allow later fills and overlaps.
The new objects do not have to be perfect immediately. - Work with the Multipoint Line tool (CDR: Polyline).
You can work very quickly with Multipoint Line, since only one mouse click is required for each node.
Lines are drawn with single mouse clicks.
Freehand curves are drawn with the mouse button pressed down. - Work with the Bezier tool.
With Bezier you can create very harmonic curves. However, it requires a longer training period than other tools.
With single mouse clicks lines are drawn.
Freehand curves are drawn with the mouse button pressed down.
With pressed mouse and Alt key the last set node is moved. To do this it is necessary to activate in the Options, Show Node Tracking.
The C key, pressed briefly, gives the active node the property cusp.
The S key, pressed briefly, gives the active node the symmetrical property.
A double click for the last node completes the editing. - Work with the tools Rectangle and 3-point rectangle as well as Ellipse and 3-point ellipse.
Closed objects are created automatically.
With the 3-point tools, you can very well respond to the conditions of a photo. - Finish new objects with the Form tool.
Convert rectangles and ellipses into curves if necessary.
If necessary, convert individual lines into curves.
Add or remove nodes if necessary.
If necessary, convert nodes to cusp, symmetrical or asymmetrical nodes. - Assign object styles.
Object styles for contours, light edges, highlights.
Do it this way, if an illustration was created by tracing a photo.